
 By admin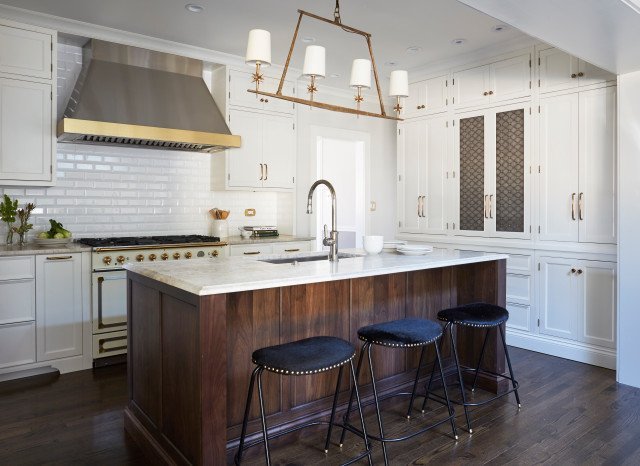
Your kitchen is stuck in 1998. Oak cabinets, laminate counters, brass hardware, fluorescent lighting — the full time capsule. A full remodel would cost $25,000+, which isn’t happening. But here’s what I’ve learned from refreshing dated kitchens on tight budgets: you don’t need a remodel. You need about five strategic changes that trick the eye into seeing “modern” instead of “dated.”
1. Paint the Cabinets ($100–$300)
This is the transformation. Dated wood cabinets painted in a current color — warm white, soft greige, deep navy on the island — instantly erase 20 years. It’s a weekend of work and the highest-impact change on this list. Our guide to painting cabinets without sanding makes it approachable, and updating cabinets cheaply covers all the options.
2. Swap the Hardware ($50–$200)
Brass knobs and dated pulls are a timestamp. Matte black, brushed nickel, or champagne bronze pulls modernize cabinets in an afternoon — even if you don’t paint. Measure hole spacing first so replacements fit without drilling.
3. Update the Lighting ($50–$200)
Nothing dates a kitchen like a fluorescent box or a brass-and-glass flush mount from 1995. Swap it for a simple modern pendant or semi-flush fixture ($50–$150). Add under-cabinet LED strips ($30–$80, peel-and-stick) and the kitchen glows like a showroom. Good lighting is also covered in our light bulb guide — 3000K in the kitchen is the modern sweet spot.
4. Refresh the Backsplash ($50–$300)
A dated backsplash (looking at you, 4-inch laminate strip or busy ’90s tile) drags down the whole kitchen. Options by budget:
- Peel-and-stick tile ($50–$150): genuinely convincing now, renter-friendly, weekend project.
- Paint the existing tile ($30–$60): tile-specific paint or bonding primer + enamel transforms busy patterns into clean solids.
- Real subway tile ($200–$400 DIY): the timeless choice. White subway tile has been “modern” for a century.
5. Address the Countertops (Without Replacing Them)
Full countertop replacement is $2,000–$5,000 — not “cheap.” But:
- Countertop refinishing kits ($100–$200) resurface laminate in a stone look. Not forever, but buys years.
- Butcher block ($200–$500 for a small kitchen) is the cheapest real replacement — warm, modern, DIY-friendly.
- Declutter ruthlessly. Counters covered in appliances and clutter read “dated” regardless of material. Clear them and the kitchen instantly looks more modern.
6. Modernize the Faucet and Sink Area ($100–$250)
A modern pull-down faucet ($100–$200) is a small change with outsized perception impact — it’s one of the first things people touch and notice. Pair it with a new soap dispenser and a decluttered sink area.
7. The Finishing Touches ($50–$150)
- New outlet and switch covers — yellowed plastic ages a kitchen; $1 each to replace.
- A runner rug in a modern pattern softens the space and adds intentional style.
- Open shelving for one section — remove two upper cabinet doors, style the shelves simply. Instant modern farmhouse.
- Fresh caulk around the sink and counters — grimy caulk whispers “old” even when everything else is new.
- Plants or a bowl of fruit — living things make any kitchen feel current and cared for.
What NOT to Bother With
- Replacing appliances piecemeal — one stainless appliance among white ones looks worse than a matched set. Wait until you can do them together, or lean into the retro.
- Trendy colors on permanent elements — paint is cheap to redo; tile and counters aren’t. Keep permanent choices timeless.
- Partial remodels that create new problems — new counters on failing cabinets, for example. Fix structure before cosmetics.
The $1,000 Modern Kitchen Plan
Cabinet paint ($200) + hardware ($120) + light fixture ($100) + under-cabinet LEDs ($50) + peel-and-stick backsplash ($120) + faucet ($150) + runner rug ($60) + outlet covers and caulk ($30) + misc ($70) = roughly $900. One month of weekends. The result won’t fool a contractor, but it will absolutely fool everyone else — and more importantly, you’ll stop wincing every time you walk in.
The Order of Operations (Do It In This Sequence)
Kitchen refreshes go wrong when done in the wrong order — paint splatter on a new backsplash, hardware holes that don’t line up with new paint. Follow this sequence:
- Declutter and deep clean first. You can’t assess what needs changing in a cluttered kitchen, and paint won’t stick to grease.
- Lighting and electrical. Swap fixtures before painting — you’ll be on ladders near fresh paint otherwise. Turn off breakers, obviously.
- Cabinet painting. The messiest job goes early. Remove doors, paint, and let them cure while you do everything else.
- Backsplash. After cabinets (so tile meets the finished cabinet color), before counters are cluttered again.
- Hardware. Install on cured cabinet paint — usually 1–2 weeks after painting. Mark this on your calendar so you don’t rush it.
- Faucet and sink area. Plumbing after painting means no paint damage from wrench slips.
- Finishing touches last: outlet covers, rugs, decor, caulk touch-ups. These are the jewelry — they go on after the outfit.
Total realistic timeline: 4–6 weekends, not one. Rushing the sequence causes rework; patience causes compliments. And live with each stage for a few days before starting the next — you’ll make better decisions about the remaining steps once you see each transformation land.
The $200 Version (Tightest Budget)
If even $1,000 is too much right now: declutter ruthlessly (free), paint the walls ($40), swap cabinet hardware ($60), replace the light fixture with a $40 modern one, add under-cabinet LED strips ($30), and re-caulk everything ($15). That’s under $200 and one weekend. It won’t transform the kitchen — but it’ll make it feel cared for instead of tired, which is 80% of the battle. Do the bigger refresh when the budget allows; this holds the line until then.
Don’t forget the ceiling: a dated kitchen often has a yellowed ceiling that drags down every other update. A fresh coat of bright white ceiling paint ($25, one afternoon) makes new wall paint, lighting, and cabinets all look better — it’s the backdrop everything else performs against. Skip it and the room never quite feels finished.
For more before-and-after proof that paint beats demolition, browse This Old House’s budget kitchen remodels — their budget kitchen features show $1,000 transformations in real homes.
The Bottom Line
How to make an old kitchen look modern cheaply: paint the cabinets, swap hardware and lighting, refresh the backsplash, declutter the counters, and update the faucet. About $1,000 and a few weekends buys a transformation that looks like $15,000. Start with paint — it’s the change that makes all the other changes look intentional instead of piecemeal.